How to Convert your Audio CD collection to MP3
So you have a huge audio CD collection and you would like to convert it to MP3 files. You need a CD to MP3 Converter to do such conversion. One of the most used Windows' MP3 Converter is named FreeRIP.
Getting audio from a CD to a PC file isn't an easy operation. If you tried to open an Audio CD from My Computer Windows' applet, you know that Windows shows CD tracks as *.cda files, and if you tried to copy those CDA files to your hard drive you got a bad surprise: they won't play unless the original CD is in the drive. This happens because .cda files aren't actual audio files. They only are the way Windows uses to show the Audio CD index, but those files are useless! They simply do not contain any audio information.
So if you are wondering how can actual audio be exctracted from the CD, the answer is: you need a software that can access low level CD interface and copy its content (the music!) to your hard drive. This operation is known with the term "ripping", that's where FreeRIP gets part of its name. The other part, FREE, come from the fact that FreeRIP Basic edition is offered free of charge. If you need more options, a more advanced edition of FreeRIP exists, named FreeRIP Pro, and it is sold at a very affordable price. But at the moment FreeRIP basic can do.
First thing you have to do now is download and install FreeRIP, so go to FreeRIP download page http://www.freerip.com/download.php, click the download button and complete the installation.
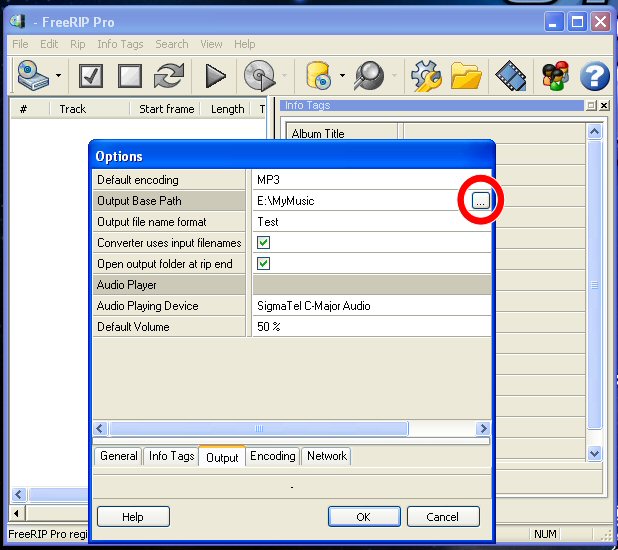
Once FreeRIP had been installed run it and select File->Settings->Options... menu to access configuration panel. As you can see FreeRIP has a number of options and settings, but you are lucky because most of them will do with the default value. The only setting I suggest you to change is the default output folder. FreeRIP use your desktop as defualt output folder, but you will probably like to use a different place to store your music files. So click on the Output tab of FreeRIP Options window, select Output Base Path line, then click on the three dots button at the right of the line to change it.
Now if you have more than one CD player attached to your computer, you probably want to go back to General page and check whether the right player is selected on CD Device line. If it is not, select the line and again click on the three dots button at the right to change it.
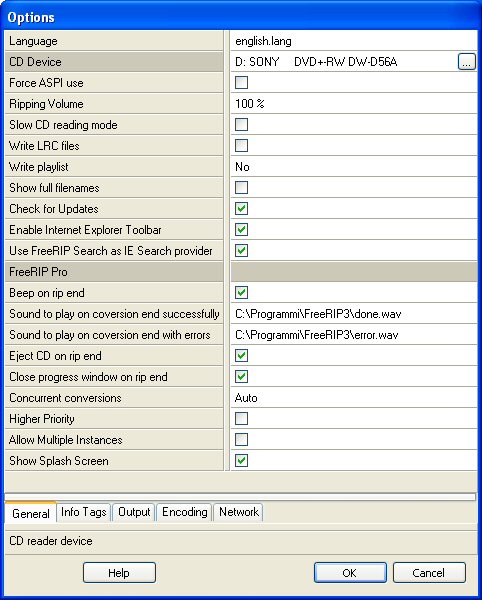
Now, if you like, you can explore all the pages and check whether settings do for you, and eventually change them. But, if you are not sure about what you are doing, just leave the defaults.
One of the most interesting FreeRIP settings page is the Encoding one. There you can tweak all the output encoding settings. Again the advice is to leave them alone, unless you really know what you are doing. Many users like to play with MP3 encoding setting, again I must say that FreeRIP defaults are usually optimal, in fact FreeRIP MP3 deafult encoding uses VBR encoding and uses the widest bitrate rage (32-320kbps) which guarantees the best quality.
Once you have done with the settings, press OK button to save the options and insert your audio CD into the CD player. FreeRIP should automatically detect that you inserted a CD, but if it does not do it, you can force it to read the drive contents with File->Refresh CD menu option.
As soon as FreeRIP loads the CD table of contents (TOC), it will perform an Internet search to retrive info about the CD. In fact usually Audio CD only contains audio and no info about tracks titles and artist, which is a shame because a standard way to store those info in the CD itself exists (it is named CD-Text) but it is not widely used by Audio CD publishers.
That's why FreeRIP relies on two external services to get CD information: the well known freedb.org and a database name FreeRIP CD DB which is not widely used but can store more detailed info than freedb.org,
In any event you must be sure that FreeRIP can access the Internet in order to get CD info; so it's better you review Windows Firewall settings, or your personal firewall or antivirus software settings to be sure it is allowed.
If everyting is going well you should see something like this:
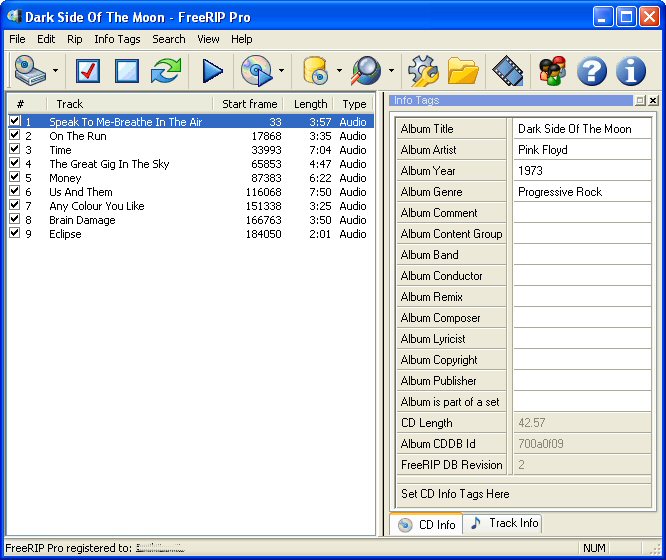
Now just select the tracks you want to get in MP3 format (FreeRIP selects all the tracks as a default) and use Rip->Rip Selected Tracks to MP3 menu option to convert them to MP3.
Download FreeRIP CD to MP3 Converter.